A torsion free subframe is a bit of a complicated subject and ask 3 different overlanders about subframes and you would likely get 4 different answers. Some of the questions you need to answer before starting your subframe are:
A. What type of chassis are you starting with, is it flexible or stiff?
B. How do you intend on using your RV? Offroad, rugged road or tarmac.
C. What are your engenering skills?
D. How is your habitat constructed? Strong or needs subframe support?
After going through these questions we decided on a “rail-on-rail” shock mounted subframe. After a hardmount subframe this is the easiest for a home builder to design and build. Given the size and amount of metal involved with the subframe we turned to Turner Welding and Fabrication to help us out. After designing the subframe using SketchUp I exported a 2D image for them to follow. By contacting a few different owners with similar RV’s and reading the “Build Your Own Overland RV” book I settled on 3″x5″x3/16″ rectangular tube steel for the entire frame. Below is my design, I am just a hobbyist and not an engineer so if you decide to use this you assume all responsibility.
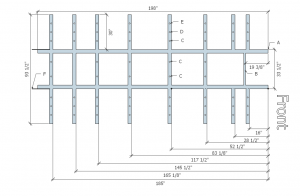
This is a 2D export from Google Sketchup of the subframe I designed.
Some design issues to consider.
- Allow for about 4″ of separation at the front of the subframe, this is important for chassis mounted items like fuel and air tanks.
- Hardmount the frame at the rear to the chassis
- With our 1120 the chassis already had shock mounting points. We made mating ones for these on the subframe.
So since we were still in Florida we contacted Turner Industrial in Ft. Pierce for a quote on the subframe fabrication. The quote seemed fair so we gave them the go ahead. Once fabricated and mounted on the truck we headed to Vermont for the summer. Then we removed the subframe, dustless blasted the chassis, painted both and reunited them.


